Elasticsearch is a powerful search and analytics engine built on Apache Lucene, widely used for applications requiring real-time data processing and complex querying capabilities. Companies like Adobe, Vimeo, and Microsoft leverage Elasticsearch to enhance search functionalities and improve user experiences. In this guide, we'll explore how to seamlessly integrate Elasticsearch into an ASP.NET Core application.

Pasang Tamang
May 31, 2024

Prerequisites
Before diving into the integration process, ensure you have the following tools and knowledge:
- Microsoft Visual Studio 2022 or later: The development environment for building and running ASP.NET Core applications.
- Familiarity with ASP.NET Core MVC: Basic understanding of creating and managing ASP.NET Core MVC projects.
What is Elasticsearch?
Elasticsearch, developed in Java, offers distributed search capabilities and handles JSON documents efficiently. It's known for its scalability, high availability, and robust search features, making it ideal for various applications.
Download and Install Elasticsearch
Elasticsearch can be deployed both locally and in the cloud. While cloud services like Azure and AWS offer managed Elasticsearch services, you might prefer to set it up on your local machine for development and testing. Here’s how to install Elasticsearch locally:
-
Download Elasticsearch:
-
- Visit the Elasticsearch download page.
- Choose the appropriate version for your operating system and download the ZIP file.
-
-
Install Java:
-
- Elasticsearch requires an updated Java Virtual Machine (JVM). Ensure you have Java installed on your system.
-
-
Extract and Run:
-
- Extract the downloaded ZIP file to a directory, such as C:\Elasticsearch.
- Navigate to the bin directory within the extracted folder.
- Run elasticsearch.bat to start the Elasticsearch service.
- Open a browser and navigate to http://localhost:9200 to verify that Elasticsearch is running. You should see a JSON response indicating the service is active.
-
-
Security Details:
-
- After the initial setup, you’ll receive your username and password, which are required for securing Elasticsearch and integrating it with your application.
-
Integrating Elasticsearch in ASP.NET Core
Integrating Elasticsearch with an ASP.NET Core application involves several steps, from installing the necessary packages to configuring the middleware and performing search operations. Here’s how to do it:
Package Installation
First, you need to add the Elasticsearch client libraries to your ASP.NET Core project. These libraries facilitate communication between your application and the Elasticsearch server.
Install the NEST package, a .NET client for Elasticsearch:
- Using NuGet Package Manager: Search for and install NEST.
- Using Package Manager Console
PM> Install-Package NEST -Version 7.17.5
Adding Elasticsearch Middleware
To integrate Elasticsearch into your ASP.NET Core project, you’ll need to set up middleware that connects to the Elasticsearch instance. Follow these steps to configure the middleware:
- Create a Model Class: Add a new model class in the Models folder that represents the structure of the JSON data you will be indexing.
public class ArticleModel {
public int Id { get; set; }
public string Title { get; set; }
public string Link { get; set; }
public string Author { get; set; }
public string AuthorLink { get; set; }
public DateTime PublishedDate { get; set; }
}
- Configure App Settings: Open appsettings.json and add the Elasticsearch configuration settings, including the base URL and the default index name.
{
"ElasticSettings": {
"baseUrl": "http://localhost:9200/",
"defaultIndex": "articles"
}
}
- Create an Extension Class for Elasticsearch: Add a new class, ElasticSearchExtension.cs, in an appropriate folder to manage the Elasticsearch connection and configuration.
public static class ElasticSearchExtension {
public static void AddElasticSearch(this IServiceCollection services, IConfiguration configuration) {
var baseUrl = configuration["ElasticSettings:baseUrl"];
var index = configuration["ElasticSettings:defaultIndex"];
var settings = new ConnectionSettings(new Uri(baseUrl))
.PrettyJson()
.DefaultIndex(index);
var client = new ElasticClient(settings);
services.AddSingleton<IElasticClient>(client);
CreateIndex(client, index);
}
private static void CreateIndex(IElasticClient client, string indexName) {
var createIndexResponse = client.Indices.Create(indexName, index => index
.Map<ArticleModel>(x => x.AutoMap()));
}
}
- Use the Extension in Startup: Open Program.cs or Startup.cs and use the AddElasticSearch extension method to configure Elasticsearch as middleware.
var builder = WebApplication.CreateBuilder(args);
builder.Services.AddElasticSearch(builder.Configuration);
Adding Documents to Elasticsearch
You can add documents to your Elasticsearch index in two ways: individually or in bulk. Here’s how you can implement both methods:
- Single Document Insertion: Create a controller action to handle the insertion of a single document.
private readonly IElasticClient _elasticClient;
public ArticleController(IElasticClient elasticClient) {
_elasticClient = elasticClient;
}
[HttpPost]
public async Task<IActionResult> Create(ArticleModel model) {
await _elasticClient.IndexDocumentAsync(model);
return View();
}
- Bulk Importing Documents: For scenarios where you need to import multiple documents, such as initializing your index with a large dataset, use a bulk import method
[HttpPost]
public IActionResult Import() {
var jsonData = System.IO.File.ReadAllText("path/to/articles.json");
var articleList = JsonConvert.DeserializeObject<List<ArticleModel>>(jsonData);
if (articleList != null) {
foreach (var article in articleList) {
_elasticClient.IndexDocumentAsync(article);
}
}
return RedirectToAction("Index");
}
Searching Documents
Elasticsearch’s powerful search capabilities allow you to query your indexed data efficiently. Here’s an example of how to implement a search feature in your application:
- Search by Keyword: Add a method in your controller to search documents based on a keyword.
public ActionResult Index(string keyword) {
var results = _elasticClient.Search<ArticleModel>(s => s
.Query(q => q.QueryString(d => d.Query('*' + keyword + '*')))
.Size(5000));return View(results.Documents.ToList());
}
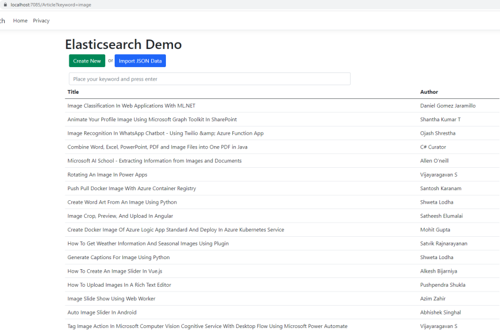
This method uses the QueryString query to search for documents containing the specified keyword. You can customize the search query to suit your application's needs. You can read more about the search
The output of the search looks like this in this screenshot
Additionally, if you're using Umbraco as your content management system (CMS), integrating Elasticsearch can greatly enhance search capabilities and performance. Umbraco's flexible content structure combined with Elasticsearch's powerful search features allows for efficient indexing and retrieval of content. By integrating Elasticsearch into Umbraco, you can achieve fast and accurate search results, simplifying content management and enhancing user experiences.
Conclusion
Integrating Elasticsearch with ASP.NET Core opens up a world of possibilities for building applications with advanced search and analytics capabilities. In this guide, we covered the basics of setting up Elasticsearch, configuring it in an ASP.NET Core project, and performing essential operations like indexing and searching documents. While this article provides a solid starting point, Elasticsearch offers many more features that you can explore to further enhance your applications.
Feel free to dive deeper into Elasticsearch's documentation and experiment with more complex queries and configurations. If you have any questions or need further assistance, don't hesitate to leave a comment. Happy coding!